Using List Views, when having more than 50 views

Problem:

If you want to use an app part in SharePoint and have more than 50 different views, only the first 50 will be available to select in the web part configuration pane.

Solution:

  1. select the view on the main .aspx of the list / library (here it will also work for more than 50 views)
  2. open that .aspx page with SharePoint Designer and navigate to the view .aspx (All Files – Shared Documents – Forms – …)
  3. copy the <view>….</view> part
  4. convert that to XML encoded string (there are many free online converters available)
  5. add the list / library app part to some .aspx page and EXPORT it
  6. edit the exported file with some code editor and replace the view string with the generated one
  7. save with a new name
  8. import the modified web part file and use

have fun…!

1 Star2 Stars3 Stars4 Stars5 Stars (1 votes, average: 5.00 out of 5)
Loading...

Using Graph in MS Flow (Bearer Token)

Problem:

I had the need to give our users a way, to register external users through the SharePoint interface for a custom solution also based on SharePoint.
It was a little bit tricky to get a token from Graph to use it in the next action.
To save your time, I document it here…

Solution:

  1. register an app on https://apps.dev.microsoft.com/
    make sure, you grant the application appropriate permissions in Azure AD. In my case it was “User.ReadWriteAll” (application permission!)
    then generate a password and also note down the application ID (you need it later);
    in Azure AD grant the application the admin consent for the permissions!
  2. In Flow add an action “HTTP Request”
    Note that the body content must be URL encoded
  3. Now you have to get the token out of the response;
    use the action Initialize Variable and a custom expression
    (where ‘GetAccessToken’ is the name of the action from before!)
  4. again use an action HTTP Request to do the POST

1 Star2 Stars3 Stars4 Stars5 Stars (2 votes, average: 4.50 out of 5)
Loading...

MS Flow – Calculating DateTime Difference

Problem:

I needed something like calcDateTimeDiff formula, but wasn’t available in Flow.  The data source in my case was a SharePoint list and I wanted to write the time difference (daily work time) back to the list in a string column.

Solution:

1. calculate the datetime difference in ticks() format – yes, that’s the trick!
One tick = 1 nanosecond
sub(ticks(item()[‘stEnd’]),ticks(item()[‘dtStart’]))

2.  Starting the day at 00:00 and add the seconds, then define the output format (1 second = 10.000.000 ns)
addSeconds(’00:00:00′,int(div(int(variables(‘testDiffDate’)),10000000)),’HH:mm:ss’)

1 Star2 Stars3 Stars4 Stars5 Stars (2 votes, average: 5.00 out of 5)
Loading...

SharePoint Excel Data Refresh with O365 Pro Plus

My environment:
– SharePoint on-prem 2013
– Office Online Server
– Excel Office Pro Plus (2016)
– Data source = SharePoint list

Problem Description:

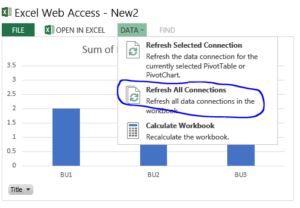
One day I wasn’t anymore able to auto refresh my SharePoint embedded charts that pulled data from SP lists.
I had to do some research until I found that it’s a combination of my new Excel version and the Office Online server. Due to changes in the security model, the standard settings didn’t work anymore.

Solution:

  1. Enable “From OData Data Feed (Legacy)” in the Excel options on the “Data” tab
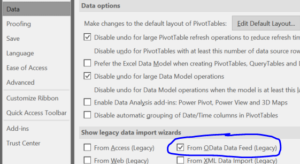
  2. In Excel on the Data tab click on “Get Data – Legacy Wizards – From OData Data Feed (Legacy)
  3. Connect to your site adding /_vti_bin/listdata.svc to your URL
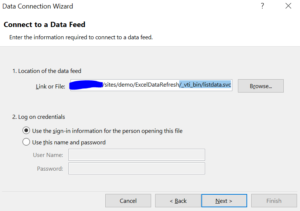
  4. on the next page select the list where you want to pull data from
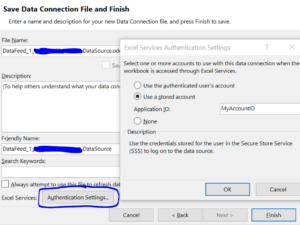
  5. now on the last wizard page it’s very important, that you use a stored account instead of Windows authentication (create on in “Secure Store Service” – Link)

Now you can go on creating your charts and then embed it in SharePoint with the Excel web part.

Have fun!

If that still doesn’t work, some other things to check:
– check, if the SecureStoreService is set to type “Individual”
– In the members section add the FQDN$ (if on-prem) of the OOS servers
– in OOS configuration make sure -AllowHttpSecureStoreConnection is set to TRUE
– in the c2wtshost.exe.config (under path C:\Program Files\Windows Identity Foundation\v3.5\) make sure, that following line is NOT commented:
<add value=”NT AUTHORITY\Network Service” />
(restart OOS service)
– make sure, all BIServers are registered in OOS
New-OfficeWebAppsExcelBIServer –ServerId YourSQLServer\POWERPIVOT

1 Star2 Stars3 Stars4 Stars5 Stars (1 votes, average: 5.00 out of 5)
Loading...